Choosing The Right Selector For Web Scraping: CSS or XPath

Do you know which is the correct selector to use in web scraping? Web scraping has been quite popular in the recent decade to extract data from the internet. It helps businesses acquire and analyze data to make better business decisions. Thanks to automated technologies, web scraping has never been easier than it is now.
Do you know which is the correct selector to use in web scraping? Web scraping has been quite popular in the recent decade to extract data from the internet. It helps businesses acquire and analyze data to make better business decisions. Thanks to automated technologies, web scraping has never been easier than it is now.
However, regardless of the tool or framework you select, you must make a crucial decision to ensure that your scraper scrapes the data politely. That is whether to extract web elements using XPath or CSS selectors, which you”ll learn in this article.
Let’s dive in with some existing examples.
What is an XPath selector?
XPath stands for XML Path Language. However, it uses non-XML syntax to select tags or groups of tags from an XML document or HTML, as with web scraping. XPath enables you to write expressions to access an HTML or XML element directly without traversing the entire HTML tree.
To understand how you could access an element using the XPath, let’s dig deeper with an HTML code. I assume that you already know some basic HTML.
<!doctype html>
<html xmlns=”http://www.w3.org/1999/xhtml” lang="en" xml:lang="en">
<head>
    <meta charset="utf-8">
    <title>Awesome Products at your Fingertips</title>
</head>

<body>
    <h1>Description of product features</h1>
    <p>These products are great. So let's just look at the features !</p>
    <ul id="product-list" class=”basic-list”>
	   <li>Item 1</li>
	   <li>Item 2</li>
	   <li>Item 3</li>
	</ul>
</body>
</html>
You can type the above code in an editor of your choice and save it as products.html. Then you may view it in a browser (preferably Google Chrome as we’ll walk through this example with it).
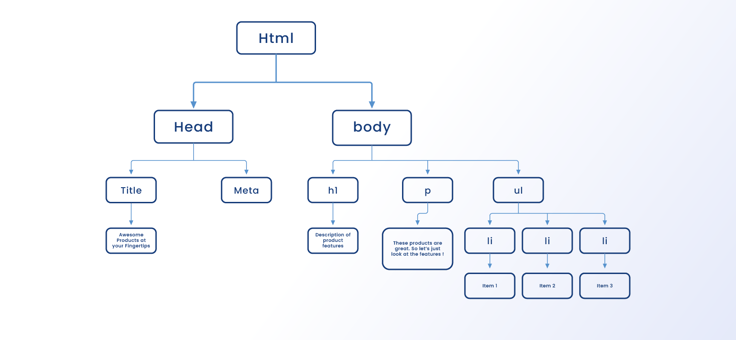
When the browser runs this code, it phrases the HTML and creates a tree representation of the elements. It is known as the DOM (Document Object Model) in the following form:

You can read more about the DOM at the given link. Now our focus here is on the XPath on how to navigate to each of these elements straight away without traversing the entire tree. So let’s begin with the basic terminology of the Xpath.
What are Nodes?
With XPath, the most fundamental element is a node. Well, nodes are simply the individual elements you just saw in the DOM tree. As we go along in this article, you will even further discover that nodes consist of tag elements, attributes, strings values assigned to it, and so on. There are seven in each XML or HTML page, and let’s look at each node type closely.
- Element node – These are the major tags in an HTML document. For instance, in our example, the elements nodes are <title>,<meta>,<body>,<h1>,<p>,<ul>,and <li>.
- Attribute node – You can provide elements nodes with properties to give them unique names or apply CSS styles. In this example, we have provided the <ul> element with attributes “id” and “class”. More on ids and classes later.
- Atomic values – these are the values that are inside the node elements. Over here, the atomic values are the text inside the <title>, <h1>,<p> and each of the three <li> elements.
While the above three are the most significant ones, it is also vital to know the following four just for information’s sake.
- Namespace: Since XPath also deals with XML documents, it is a standard that specifies how you can use elements and attributes. It is identified by URI (Uniform Resource Identifier). For the latest HTML 5 version, you can set the namespace like this: <html xmlns=”http://www.w3.org/1999/xhtml” lang=”en” xml:lang=”en”>.
- Comments: These are the comments part of an HTML or an XML document that the compiler or a parser does not process.
- Process instruction: As with the case of HTML documents, they are the nodes that link external files such as CSS and JavaScript files. For example, the<link> node to include CSS files and the <src> node to include JavaScript files.
- Root node: As you guessed it right, this is the topmost element of an HTML document: the <html> node.
What is the relationship between nodes?
- Parent: These are the root elements of the DOM tree that are precisely one level up. Each element has exactly one parent. According to our example, the parent of <li> element is <ul>.
- Children: Children nodes are exactly one level down in the DOM tree. As per our example <h1>,<p> and <ul> elements are children of the <body> element.
- Siblings: These are the elements that share the same parent. In our example, both the <li> elements are siblings of the <ul> parent. Also <h1>,<p> and <ul> are siblngs as they belong to the same parent <body>.
- Descendants: Any elements that are one level down are descendants. For instance, the <title> element is a descendant of the <head> element.
- Ancestor: Any element level up in the DOM tree is called an ancestor. In our example <li> element’s ancestors are <ul>,<body> and <html>.
How to find the XPath of an HTML element?
There are two ways of doing this. First, Let’s demonstrate it or code an example. As I have mentioned above, I hope you have saved it on your local disk and are ready to be viewed in your browser.
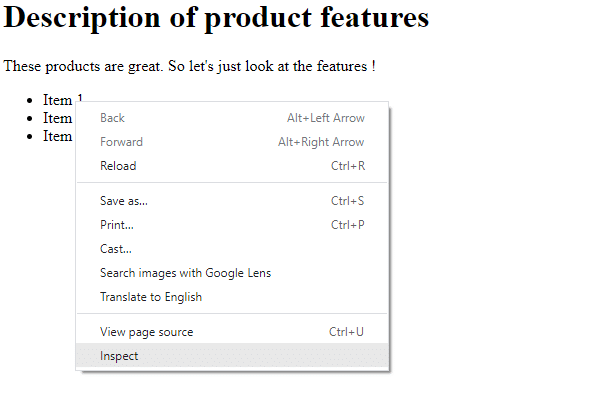
When the page loads, hover your mouse over item 1 and right-click on it. Then select the Inspect from the menu items that appear as shown in the screenshot below:

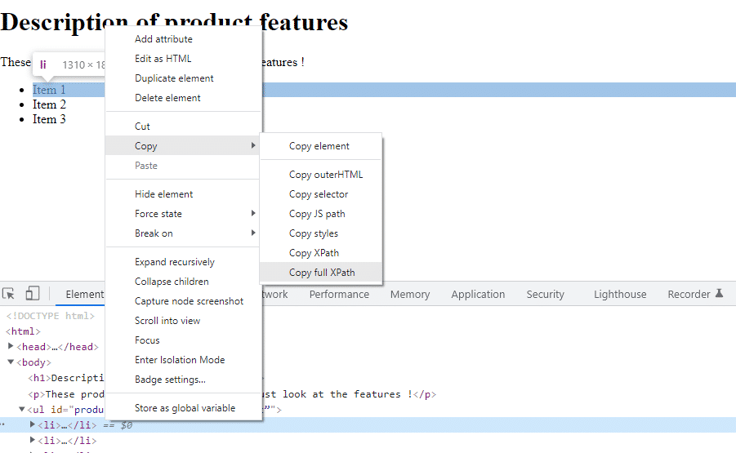
Then you would be able to find the full XPath by clicking on the <li> element in the console and selecting “copy” from the drop-down menu, and then specifying “Copy full XPath as shown below:

Then after pasting it in a text file or somewhere, you would get:
/html/body/ul/li[1]
This is known as the absolute path. I will explain below how you have derived it.
Step 1 => li[1] //Here one denotes the first li element

Step 2 => /li[1]

Step 3 => ul/li[1]

Step 4 => /ul/li[1]

Step 5 => body/ul/li[1]

Step 6 =>  /body/ul/li[1]

Step 7 =>  html/body/ul/li[1]

Step 8 => /html/body/ul/li[1]
Absolute Path
With this method, you need to work your way backward, starting from the target element all the way back to the root element. You add a forward slash before the element you have just added as you write each element. So let’s look at how you could work out the XPath for the first <li> element manually:
Although the above method seems to be lengthy, it will help you understand how to build the full XPath. Now over to the relative method.
Relative Path
//*[@id="product-list"]/li[1]
As you can see, it is pretty short, and the path is relative to the parent <ul> element. Since the <li> element does not have an id attribute, its relative path is relative to the <ul> element.
The difference between relative and absolute paths
The significant differences are that full XPath is not readable and hard to maintain. The other obvious concern is that if there are changes to any element starting from the root element, the absolute XPath will not be valid. So it makes sense to use the relative XPath.
However, before commenting further on that, let’s first look at the advantages and disadvantages.
Advantages and disadvantages of XPATH
Advantages
With XPath, you don’t have to worry if you don’t know the name of an element because you can utilize the contains function to look for probable matches. Therefore, you can go up the DOM when querying for items to scrape.
The other significant benefit of CSS is that it works in older legacy browsers like outdated versions of Internet Explorer.
Disadvantages
As you have learned above, its most significant disadvantage is easier to break when you change the elements in the path. It can be hard to comprehend compared to the CSS selectors that you will find out below.
Also, when retrieving elements from the XPath, its performance is pretty much slower than that of CSS.
What is a CSS Selector?
As you already know, CSS stands for Cascading Style Sheets prominently used in styling HTML elements in a web page. These styles include applying colors to your font, background images, and colors, aligning and positioning elements, and increasing/decreasing spaces between paragraphs.
To set a style to an HTML element, you need to specify it through a CSS Selector. Let’s start with a simple example starting with the markup in the next section.
How are CSS selectors created?
<h1 id="main-heading" class="header-styles" name="h1name">What are CSS Selectors?</h1>
So here is the CSS selector for the above element:
- <h1>-selects by the element name <h1>
- #main-heading – #specifies the id of the element
- .header-styles – The dot denotes the class name
- [name=”h1name”] – You can specify the attributes in square brackets.
You could combine them as well:
h1.header-styles-This CSS selector selects h1 elements with class header-styles.
Advanced Selectors
The > operator is used to select children. In contrast, the + operator chooses the first sibling, and the operator ~ is used to pick all siblings. A few instances are as follows:
- ul#product-list > li – selects <li> elements which are children of <ul> with id of product-list.
- ul#product-list li – selects <li> elements which are descendent of <ul> with id of product-list.
- ul#product-list + li – selects first <li> element after <ul> with id of product-list.
- ul#product-list ~ li – Selects all <li> elements after the <ul> with id of product-list.
Advantages and Disadvantages of using CSS selectors
Advantages
Unlike XPath, which the Beautiful Soup does not support, CSS selectors are supported with the most effective scraping libraries. Also, unlike XPath, CSS selectors are easier to learn and maintain. Almost all the browsers support it, except legacy browsers below Internet Explorer version 8. However, people rarely use those browsers in this day and age.
Disadvantages
Even though you take the older versions of Internet Explorer out of the equation, there could still be inconsistencies with how they render on different browsers.
Since there are various CSS versions, they could create confusion among developers and beginners alike.
Another vital factor in today’s web technology is the CSS’s security.
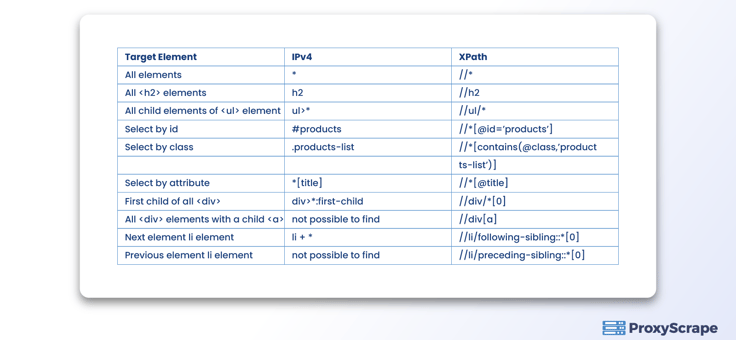
What are the differences between CSS Selectors and XPath?

The apparent difference between XPath and CSS is that XPath is bidirectional. This means you can traverse in both directions in the DOM tree. However, you can only traverse from the parent node to child nodes with CSS, known as one-directional flow.
As discussed in previous sections, XPath is harder to maintain and not a good candidate for effective readability. On the other hand, although XPath may operate in legacy browsers, the way it renders differs from one browser to another.
Therefore in that regard, the CSS has the edge.
What should you choose between the two?
XPATH stands out as CSS could only traverse from parents to the child in specific areas such as traversing up the DOM tree. AS far as the speed is concerned, CSS has the edge.
However, the speed difference between XPath and CSS doesn’t count much when it comes to web scraping. There are other factors to consider, such as network latency in web scrapping.
CSS would be your first choice when it comes to Beautiful Soup as it does not support the XPath.
Conclusion
There is no precise answer on which selectors to use for your web scraping project. As you have discovered in this article, the XPath has the edge in certain situations, whereas the CSS stands out in others.
Therefore, you need to factor in specific vital points such as traversing, browser support, and some of the technical capabilities that we discussed. We hope you will practice what you have learned and stay tuned for more articles.