


Web scraping has become an essential tool for developers, data scientists, and IT professionals looking to extract valuable data from websites. However, the challenge of avoiding bans, managing request rates, and maintaining anonymity can be daunting. Enter ProxyScrape and Scrapoxy—two powerful tools that, when integrated, make web scraping more efficient and effective.
In this post, we'll explore how to combine ProxyScrape with Scrapoxy, offering you a seamless solution for your web scraping needs. Let's get started!
Fancy a video instead? - Watch this!
Introduction to Scrapoxy and ProxyScrape
What is Scrapoxy?
Scrapoxy is a proxy management tool that simplifies the process of integrating proxies into your web scraping projects. It ensures that your scraping activities remain undetected by rotating proxies and managing request rates.
What is ProxyScrape?
ProxyScrape is a robust service that offers a wide range of proxy solutions, including free proxy lists, premium proxies, residential proxies, and a web scraping API. With features like geo-targeting, JavaScript rendering, and action execution, ProxyScrape is designed to handle even the most complex scraping tasks.
The Importance of Proxies in Web Scraping
Using proxies is crucial for several reasons:
- Data Collection: Proxies enable you to collect data from websites without getting blocked.
- Anonymity: They help maintain your anonymity by masking your IP address.
- Bypass Restrictions: Proxies allow you to bypass geo-restrictions and access content from different regions.
Integrating ProxyScrape with Scrapoxy
Integrating ProxyScrape with Scrapoxy is a straightforward process that can significantly enhance your web scraping efficiency. Follow these steps to get started:
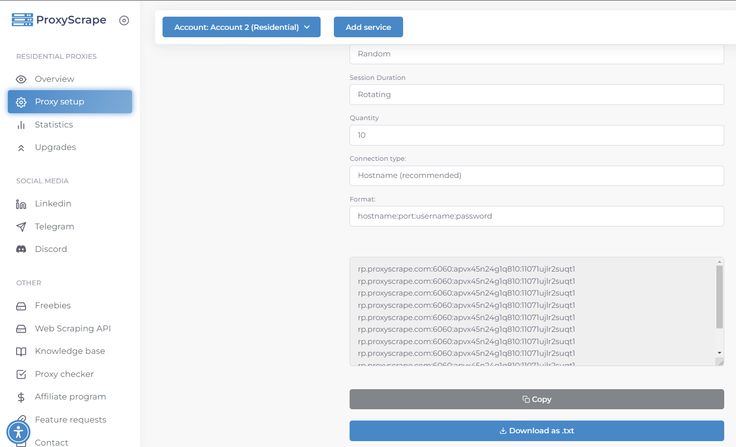
Step 1: Obtain Proxies from ProxyScrape
- Sign Up for ProxyScrape: Visit the ProxyScrape website and sign up for an account.
- Choose Your Proxy Plan: Depending on your needs, select either the free proxy list or a premium plan that offers residential or dedicated proxies.
- Download the Proxy List: Access your dashboard and download the list of proxies in a .txt format.
Step 2: Install Scrapoxy
To set up Scrapoxy, you must first understand that it operates as a Docker container. This allows for easy deployment and management of the proxy manager. Follow these steps to get Scrapoxy running on your local machine:
- If not already installed, first install Docker.
- Launch the **terminal** and execute the following command:
docker run -d -p 8888:8888 -p 8890:8890 -v ./scrapoxy:/cfg -e AUTH_LOCAL_USERNAME=admin -e AUTH_LOCAL_PASSWORD=password -e BACKEND_JWT_SECRET=secret1 -e FRONTEND_JWT_SECRET=secret2 -e STORAGE_FILE_FILENAME=/cfg/scrapoxy.json fabienvauchelles/scrapoxy- Replace admin, password, secret1 and secret2 with your own values.
- You can now access the user interface at http://localhost:8890, with the username 'admin' and the password 'password'.
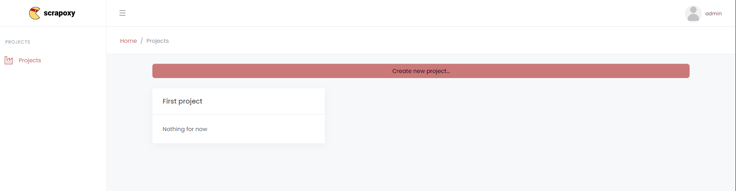
Step 3: Setup New project
In Scrapoxy, a project refers to a specific set of configurations and proxies that you manage for a particular web scraping task. Each project allows you to define the proxies to be used, set up credentials, and configure request rates and rotation policies. This modular approach makes it easier to handle different websites' requirements and improves the overall efficiency and success rate of your web scraping activities.
First, let's set up a project so we can move on to the next steps:
- In the home page, click the "Create New Project" button.
- Here you will be prompted with a form which you need to fill the information above:
- Name: Unique identifier for the project;
- Username: Authentication username used for proxy authentication in requests
- Password: Authentication password used for proxy authentication in requests
- Renew token: Click on this button to renew username and password;
- Minimum proxies: The minimum number of proxies online when the project status is CALM;
- Auto Rotate Proxies: If enabled, proxies are automatically rotated at random intervals within the specified Delay range;
- Auto Scale Up: When enabled, the project status switches to HOT upon receiving a request, and all proxies are started;
- Auto Scale Down: When enabled, the project status switches to CALM if no requests are received after a specified delay, and all proxies are stopped;
- Intercept HTTPS requests with MITM: If enabled, Scrapoxy intercepts and modifies HTTPS requests and responses.
- Certificate: Install this CA certificate to avoid security warnings in Browsers or Scrapers;
- Keep the same proxy with cookie injection: If enabled, Scrapoxy injects a cookie to maintain the same proxy for a browser session (sticky cookie);
- Override User-Agent: If enabled, Scrapoxy overrides the User-Agent header with the value assigned to a proxy instance. All requests made with this instance will have the same User-Agent header;
Within the project, we can link our proxies using a feature called a connector in Scrapoxy. In the next step, let's explore what this involves.
Step 4: Setup ProxyList Connector
As the name suggests, a connector acts as a bridge between your proxy provider and Scrapoxy. It allows you to source proxies from your provider and manage them effectively. Since Scrapoxy cannot directly support every proxy provider, you can input a list of proxies from any provider, and they will be integrated into Scrapoxy. In Scrapoxy, this connector is referred to as ProxyList. Below, you will find a step-by-step guide on how to integrate a list of proxies into the ProxyList connector.
Before creating the connector, we need to establish a new credential. As the name implies, a credential allows you to authenticate proxies from a connector. In this example, we're using a ProxyList connector. Since we already have our proxy list, there's no need to authenticate them in Scrapoxy. However, remember that each time we create a connector, we must have a credential instance for it. In the ProxyList connector, a credential serves simply as a placeholder.
In the following sections, we'll walk you through the process of setting up a credential first, followed by configuring the ProxyList connector
- Open Scrapoxy User Interface, go to your desired project and select Marketplace:
- Create a new credential:
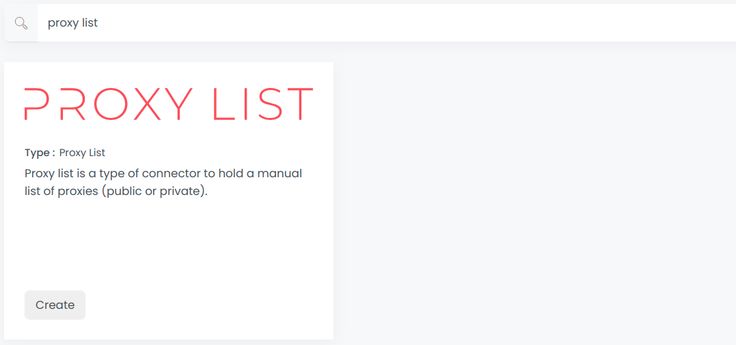
- Select Proxy List to create a new credential (use search if necessary).
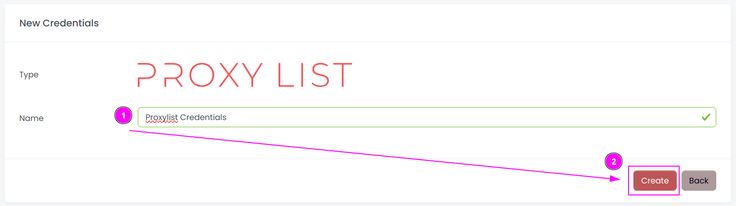
- Fill out the form by entering a name for this credential and click “Create”
- On the left panel click “Connectors” and create a new connector and select Proxy List as provider:
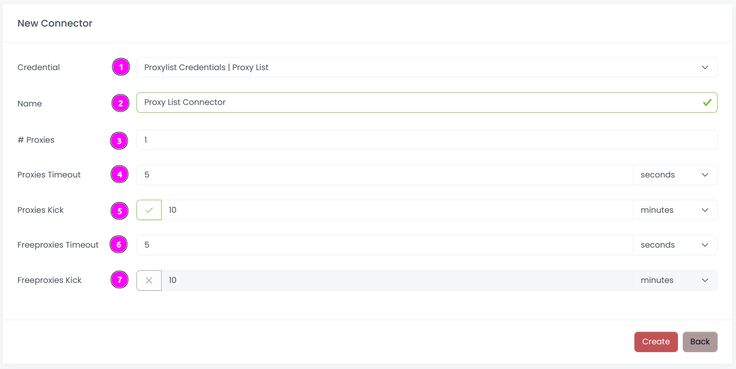
- Complete the form with the following information:
- Credential: The previous credential;
- Name: The name of the connector;
- # Proxies: The number of instances to create.
- Proxies Timeout: Maximum duration for connecting to a proxy before considering it as offline;
- Proxies Kick: If enabled, maximum duration for a proxy to be offline before being removed from the pool;
- Freeproxies Timeout: Same as Proxies Timeout but for the freeproxies pool;
- Freeproxies Kick: Same as Proxies Kick but for the freeproxies pool.
Add a proxies source
- On the connector, click on Update.

- Paste the ProxyScrape list of proxies into the text area and click the plus icon.
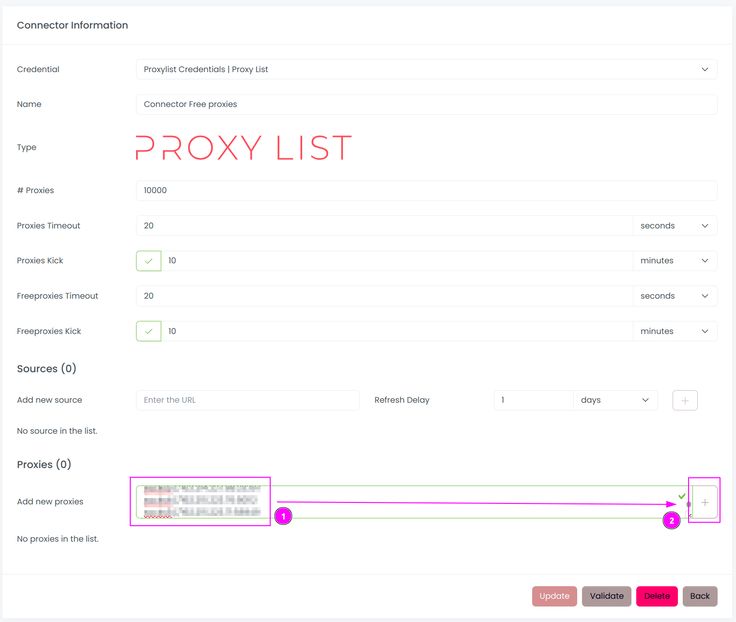
Scrapoxy supports the following formats:
- ip:port
- ip:port:username:password
- http://ip:port
- http://username:password@ip:port
- https://ip:port
- https://username:password@ip:port
- socks://ip:port (shortcut for socks5://ip:port)
- socks://username:password@ip:port (shortcut for socks5://username:password@ip:port)
- socks4://ip:port
- socks4://username:password@ip:port
- socks5://ip:port
- socks5://username:password@ip:port
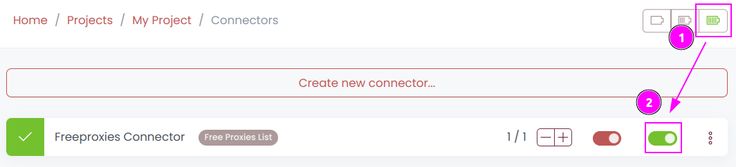
Start the connector
- Start the project;
- Start the connector.
Step 5: Integrate Scrapoxy into your web scraping process.
In this example we are gonna showcase how to integrate scrapoxy with the famous Python HTTP library Requests.
- Install the library
pip install requests
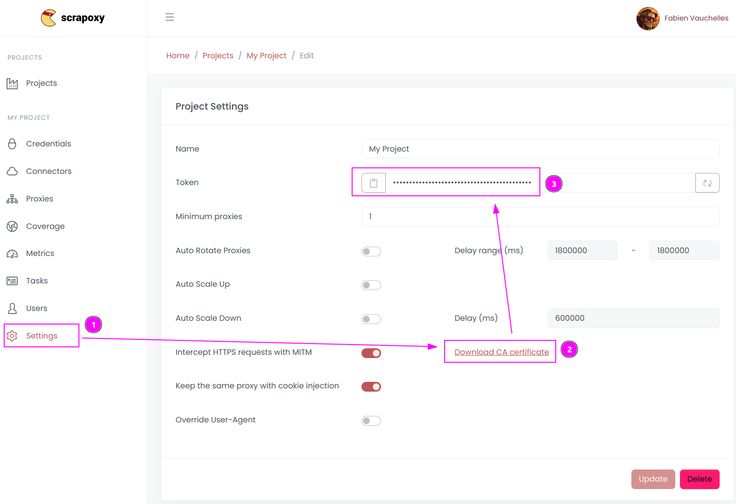
- Retrieve CA certificate and project token
- Open Scrapoxy User interface, and go to the project Settings;
- Click on Download CA certificate and save the file (Remember the project token (format is USERNAME:PASSWORD).);
- Create and run the script
- Create a file name requests.py with the following content:
import requests
ca = "/tmp/scrapoxy-ca.crt"
proxy = "http://USERNAME:PASSWORD@localhost:8888"
r = requests.get(
   "https://fingerprint.scrapoxy.io",
   proxies={"http": proxy, "https": proxy},
   verify=ca
)
print("proxy instance:", r.headers["x-scrapoxy-proxyname"])
print(r.json())
Replace USERNAME and PASSWORD by the credentials you copied earlier.
Scrapoxy includes a x-scrapoxy-proxyname header in each response, indicating the name of the proxy instance assigned for the request.
For more examples of Scrapoxy implementations, we invite you to explore this link.
Best Practices for Effective Web Scraping
To make the most of ProxyScrape and Scrapoxy, consider the following best practices:
- Rotate Proxies: Regularly rotate proxies to avoid detection and bans.
- Manage Request Rates: Keep your request rates reasonable to prevent overloading the target website.
- Stay Undetected: Use headers and cookies to mimic human behavior and avoid drawing attention to your scraping activities.
Real-World Use Case
Let's say you're scraping product data from an e-commerce website. By integrating ProxyScrape with Scrapoxy, you can:
- Fetch Product URLs: Use ProxyScrape's proxies to collect product URLs without getting blocked.
- Extract Product Details: Rotate proxies with Scrapoxy to scrape product details like price, availability, and reviews
- Store Data Efficiently: Save the extracted data to a database for analysis.
Conclusion
Integrating ProxyScrape with Scrapoxy offers a seamless solution for efficient web scraping. By using proxies to maintain anonymity, bypass restrictions, and manage request rates, you can enhance your data extraction capabilities significantly.
Ready to take your web scraping to the next level? Sign up for ProxyScrape today and start integrating it with Scrapoxy for a smooth, efficient, and powerful scraping experience.
We'd love to hear about your experiences with ProxyScrape and Scrapoxy! Share your success stories, challenges, and tips in the comments below. And don't forget to explore more content on web scraping on our blog. Happy scraping!